|
|
This section describes how to assign IPv4 addresses and network masks to implement subnetworking for UnixWare® 7 systems.
For administrative or technical reasons, many organizations choose to divide one network into several subnets. Subnetworking enables several local networks to appear as a single Internet network to off-site hosts. It divides the addresses for a single network to accommodate the fact that the network consists of several physical networks. You should consider using subnets in the following instances:
Setting up a subnet requires you to:
Subnets allow you more flexibility when assigning network addresses. For details on network address assignment and network classes, see ``Network address''.
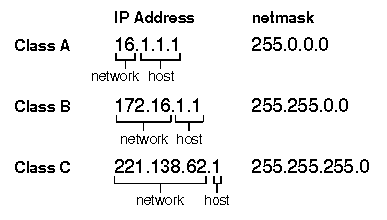
A network mask, or ``netmask'', is used to divide an IP address into a network address and a host address. When you set up a network, the network mask must be common to all network interfaces on that network. The default network masks are 255.0.0.0 for class A, 255.255.0.0 for class B, and 255.255.255.0 for class C networks, as illustrated here:
Subnets are created by extending the network ID portion of an address by taking some bits from the host portion to create a subnet portion. The remaining bits can be used for host addresses within the subnet. The number of subnets that can be created from an m-bits long subnet address is 2^m. The number of host addresses per subnet that are available from an n-bits long host address is (2^n)-2. Unlike the subnet portion of the network address, the host portion cannot consist of all 0's or 1's. See RFC 1812 and RFC 1878 for more information.
``Subnetting a class B network'' illustrates the effect on a class B address of extending a network mask from 255.255.0.0 to 255.255.255.0:

Subnetting a class B network
This scheme creates 256 (2^8) possible subnet addresses (0 through 255) with 254 (2^8-2) host addresses (1 through 254) per subnet. In this way, you can create subnets for class A and B networks by converting the second and third octets, respectively, from host addresses to subnet addresses. Notice how the netmask changes accordingly:
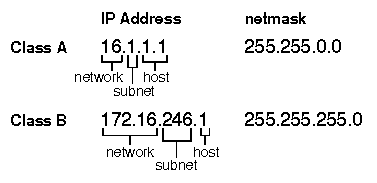
The class A network 16 can now have up to 256 subnets (16.0 through 16.255). The class B network 172.16 can also have up to 256 subnets (172.16.0 through 172.16.255). While the netmask masks the network portion of the address, the broadcast address exposes the network address and hides the host portion. For example, the broadcast address for the subnet 172.16.246, with a netmask of 255.255.255.0, is 172.16.246.255.
For more information on setting netmask and broadcast addresses using the Network Configuration Manager, see ``Basic TCP/IP configuration parameters''.
For example, if an organization has a class B network, you could assign each physical network in that network a subnet number within that network. The sixteen bits for the host ID could be allocated as eight for subnet and eight for host, or nine for subnet and seven for host, and so on. Your decision would be transparent to everyone outside that organization.
A common example of subnetworking is to apply a class C type subnet mask (255.255.255.0) to a class B network. Applying this mask to a class B network provides you with 256 possible subnets, each one of which can accommodate 254 possible hosts (the host addresses 0 and 255 are not acceptable). If you know that none of your subnets will ever have more than 126 hosts but you need more than 256 but less than 513 subnets, you could decide to use nine bits for the subnet number, and seven bits for the host addresses. The appropriate mask for this would be 255.255.255.128.
Given this scheme and a network address of, for example, 131.60, the addresses of the first and last hosts on the first subnet (131.60.0.0) would be 131.60.0.1 and 131.60.0.126. The broadcast address on this subnet would be 131.60.0.127.
Partitioning a class C address is a similar process as you must take a portion of the fourth octet as the subnet address. For example, you might partition the first three (high order) bits of the fourth octet to represent the subnet, with the last five bits representing the host:
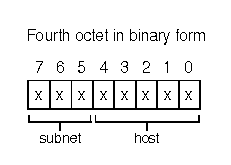
This scheme allows for up to 8 subnets of 30 hosts each, for a total of 240 hosts. The netmask for the hosts on these subnets is 255.255.255.224. The number 224 is a decimal representation of the binary octet 11100000, which masks the subnet portion of the IP address.
Possible subnets for the class C network 221.138.62.0, with associated broadcast addresses, are:
| Subnet | Hosts | Broadcast address |
|---|---|---|
| 221.138.62.0 | .1-.30 | 221.138.62.31 |
| 221.138.62.32 | .33-.62 | 221.138.62.63 |
| 221.138.62.64 | .65-.94 | 221.138.62.95 |
| 221.138.62.96 | .97-.126 | 221.138.62.127 |
| 221.138.62.128 | .129-.158 | 221.138.62.159 |
| 221.138.62.160 | .161-.190 | 221.138.62.191 |
| 221.138.62.192 | .193-.222 | 221.138.62.223 |
| 221.138.62.224 | .225-.254 | 221.138.62.255 |
The number of class A and B addresses that are available for allocation to new networks has been steadily diminishing over time and is now virtually exhausted. In the late 1980s nearly all of the new networks assigned were class B, and in 1990 it became apparent that class B networks would run out by 1994 if the trend continued. Class C addresses (with a maximum of 254 hosts) were hardly being used because they were too small to be useful for most organizations, while class B networks were too large to be densely populated by any but the largest organizations.
The network number allocation policies of the InterNIC were changed in 1990, to avert the class B address exhaustion. If you apply for a network number, you are likely to be assigned a set of several contiguous class C network addresses or a single subnetted class C network address, rather than a single class B address. Which of these you receive will depend on the number of hosts that will exist on your network(s).
Where an organization has a range of class C network numbers, the range provided is assigned as a bit-wise contiguous range of network numbers, and the number of networks in the range is a power of 2. All IP addresses in the range have a common prefix, and every address with that prefix is within the range. For example, an organization requiring about 1000 IP addresses would be assigned four class C network numbers. A range of addresses satisfying these rules would be 195.34.136 through 195.34.139, in which case the range would consist of all the IP addresses with the 22-bit prefix 195.34.136. This is represented by the notation 195.34.136/22 (with the trailing zeros removed). ``Subnetting with CIDR'' illustrates this scheme.

Subnetting with CIDR
However, the problem with this situation is that each network has to be routed separately as standard IP routing only understands class A, B and C network addresses. The result of using a range of class C addresses is a routing table explosion problem: a class B network of 3000 hosts requires one routing table entry, whereas the same network if it was addressed as a range of class C networks would require 16 entries.
To overcome the routing table explosion problem, a scheme known as Classless Interdomain Routing (CIDR or ``supernetting'') is used to implement address assignment. CIDR does not route according to the class of the network number, but instead routes according to the high order bits of the IP address (the ``IP prefix''). The process of combining multiple networks into a single entry is called supernetting because routing is based on network masks that are shorter than the natural network mask of an IP address.
The details of CIDR may be found in RFC 1518 and RFC 1519. As the main purpose of CIDR is to reduce the size of the routing tables for the Internet, these documents will not usually be of interest to you unless you are a service provider or you maintain Internet routing tables on your system.
There are two types of subnetting: static length and variable length. Static subnetting, in which all the subnets in the subnetted network use the same subnet mask, has already been described in ``Subnetting and Classless Interdomain Routing''. Native IP and RIP version 1 routing only support static subnetting. Variable length subnetting allows the subnets that make up the network to use different subnet masks. A small subnet with only a few hosts needs a subnet mask that accommodates only these hosts. A subnet with many hosts may need a different subnet mask to accommodate the hosts. Variable length subnetting allows you to divide the network so that it is possible to define adequate hosts for each subnet by changing the subnet mask for each network. RIP version 2 supports variable length subnetting as well as static subnetting. RIP version 1 only supports standard class lengths.
For example, a company with the address 195.34.136.0 needs to split the address range into five separate networks, as shown in ``Variable length subnetting''. There need to be 254 hosts on 3 of the subnets and 126 hosts on 2 of the subnets. This cannot be achieved using static subnetting as it can only divide the network into four subnets with 254 hosts each or eight subnets with 126 hosts each. To divide the address into five subnets, you should use multiple netmasks. The first four subnets use the mask 255.255.255.0 and have 254 hosts each. The first subnet can then be divided into two subnets with 126 hosts each and a subnet mask of 255.255.255.128. There would be three subnets with 254 hosts each and two subnets with 126 hosts each.

Variable length subnetting
Each time you subnet your network you lose some available addresses, as these become broadcast addresses.
To change from an internetwork that does not use subnets to one that is subnetted:
More information about subnets may be obtained by consulting the following RFCs:
| RFC | Title |
|---|---|
| 1518 | An Architecture for IP Address Allocation with CIDR |
| 1519 | Classless Inter Domain Routing (CIDR): an Address Assignment and Aggregation Strategy |
| 1812 | Requirements for IP Version 4 Routers |
| 1878 | Variable Length Subnet Table For IP Version 4 |
The Subnet Calculator:
You can start the Subnet Calculator in any of these ways:
 Tools Subnet Calculator.
Tools Subnet Calculator.
Depending on the selection made in the Subnet Calculator, the main
screen displays network address, network address length, subnet address, subnet
address length, number of hosts, host ranges, netmask, broadcast address and
comments. Use
View Expand
to examine the complete details for a selected entry in the list, and
View Collapse
to display the network address, network address length and comment. You can also
expand and collapse individual entries by double-clicking on them. You can
expand and collapse all entries by selecting
View Expand All
and
View Collapse All.
You can perform many tasks by using the shortcut buttons located under the menu bar. The purpose of these is explained by the point help.
With the Subnet Calculator you can perform the following tasks:
You must first define the top-level address that you want to subnet. The top-level address is derived from the network address and the network address length (mask length) in bits, supplied to you by your ISP or a NIC. The top-level address is also known as the IP prefix. See ``Subnetting and Classless Interdomain Routing'' for more details.
To create an address:
Add Address.
Depending on what type of network address you enter, the network address length is automatically assigned a length in bits according to whether it is a class A, B or C address. You can use the spin buttons to select the correct network address length.
Once you have defined a top-level address entry, you can add subnets to it, or you can further divide a subnet into other subnets (known as variable length subnetting). See ``Variable length subnetting'' for more details.
To add a subnet:
Add Subnets.
The Subnet column displays the mask length of the subnet and also displays the number of hosts and host ranges.
For a particular subnet mask length, you can select all the subnet ranges in the list by clicking on Select All.
You can also add hosts after you have assigned all the subnets. See ``Creating host entries''.
To view the host address ranges that are available for a top-level address or subnet:
Add Hosts.
To add hosts to a top-level address which already has been assigned subnets:
Add Hosts.
The number of hosts and host ranges are also displayed.
You can select all the host ranges in the list by clicking on Select All.
Comments allow you to label subnets and top-level addresses as they will be allotted within an organization. For example, you could identify a subnet as belonging to ``Manufacturing''.
To add a comment:
Modify Comment.
To remove hosts configured on a subnet, leaving the subnet intact:
Add Subnets.
To delete a subnet, removing the whole subnet selected and any hosts configured on it:
Delete.
To delete a top-level address together with any subnets or hosts configured on it:
Delete.
To save a new subnet calculation:
Save
, or
File Save As...
The default filename is untitled.nsc.
Save,
automatically saves the file, without entering the ``Save As''
screen.
To open a previous subnet calculation:
Open.
New.
To print reports to a printer, or save them to a file as text or as a TCL list:
Print.
A useful command to enter in this field is cat, as the output will then appear in a separate window. This means the information can be viewed easily and it also enables checking of the output. The pipe operator (|) is also supported.
The TCL Lists option allows you to save the data in a format that is suitable for later use by a Perl or TCL script.
Enter a filename. You can also use Browse to select a file.
The filename ending that is assigned depends on the print format.