|
|
SCO DHCP implements the server aspects of the Dynamic Host Configuration Protocol as defined in the Internet standards: RFC 1534, RFC 1542, RFC 2131, and RFC 2132.
The SCO DHCP server receives IP addresses from the Address Allocation Server (AAS), which provides the same service to other network services that assign temporary IP addresses. See ``Configuring an Address Allocation Server (AAS)''.
The configuration parameters supplied by the SCO DHCP server include those supported by BOOTP, the set of parameters specified for DHCP, and user-defined parameters.
The purpose of DHCP is to deliver configuration information to individual network hosts and to reduce the administrative work involved in configuring larger IP networks. DHCP can provide configuration information to any host directly connected to the network, either permanently or temporarily. The type of IP address assignment, however, depends upon the type of host.
Network hosts best suited to dynamic address assignment are desktop and laptop PCs that are routinely connected and disconnected from the network. Users of such machines typically do not require constant connection to the network. Dynamic assignment allocates them the address they need, for only the period of time that they need it, without requiring any action by you.
Other network hosts that provide a service on the network, such as routers, gateways or print servers are better suited to manual address assignment. This method gives them the same address every time they boot and you only have to configure the address once.
DHCP cannot provide configuration parameters to remote hosts connected to the network via PPP or SLIP. Pools of IP addresses configured in the Address Allocation Server for use by PPP clients should not normally be shared with those pools configured for use by DHCP clients.
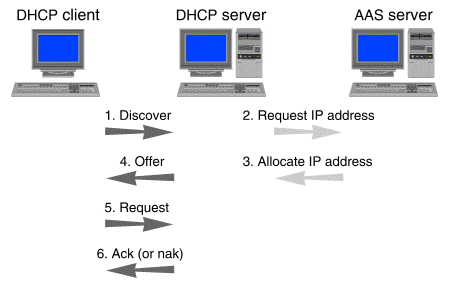
``Steps in serving configuration parameters to a DHCP client'' shows the steps that the SCO DHCP server normally undertakes to service a DHCP client with its configuration parameters.
Steps in serving configuration parameters to a DHCP client
The numbered steps in the figure show the sequence of events:
If the client's entry in the configuration file already contains an IP address, the DHCP server assigns that address to the client. See ``Manually assigning IP addresses''.
For more information on DHCP message types and message exchange, see RFC 2131.
More than one SCO DHCP server can be configured on a network, if necessary, but these servers cannot share the same pool(s) of addresses. The DHCP server can configure clients on different subnets by using BOOTP gateways. See ``Setting up a BOOTP gateway'' for more information.
You can manually assign an IP address to a particular client by creating an entry for the client in the DHCP Server Manager and entering the IP address in the client's entry. The DHCP server always assigns this address to the client. Manually assigned addresses cannot belong to any address pools maintained by the AAS. The lease for a manually assigned address is infinite. See ``Configuring DHCP client option sets''.
If there is no entry for the client in the configuration file, or if the client's entry does not contain an IP address, the DHCP server requests one from the Address Allocation Server. The AAS allocates an address from the address pool assigned to the client's subnet in the DHCP configuration file. If a subnet does not have an address pool configured, addresses cannot be allocated to clients on that subnet. Although there is no guarantee that the client will receive the same IP address it received last time, the AAS always attempts to do so. A DHCP client can also request a specific IP address. See ``IP address assignment priority''.
Every address offered by the DHCP server has either a fixed or infinite lease. See ``The lease for an assigned IP address''.
The DHCP server dynamically assigns IP addresses using the following priorities:
When assigning an address pool to a subnet, you can also establish a default lease time and a maximum lease time for those addresses. The server uses the default lease time unless the client requests a specific lease time using the ``IP Address Lease Time'' option in either a ``discover'' message or a ``request'' message. If the client requests a lease time greater than the maximum, the server offers the maximum lease time.
Both the default and maximum leases can be configured to a maximum of 136 years. There is no minimum lease. Both leases can also be specified as infinite.
Clients can request an extension of the address lease. In addition to default and maximum lease times, you can configure the lease renewal and rebind time for the addresses in the pool. The DHCP server sends the lease renewal and rebind times to the client in the ``ack'' message. The server defines these values as percentages of the lease. The default renewal time in 50%, suggesting the client request a renewal when the lease is half over. The rebind time is the point at which the server suggests the client broadcast a renewal request. This is a second renewal attempt and accommodates multiple DHCP servers that may be sharing the address pool. The default is 90%. See ``Configuring subnet option sets'' for information about specifying leases and renewal information.
To prevent an address from being assigned to more than one client at the same time, DHCP temporarily reserves the address until the client accepts or rejects it. You can configure this initial reservation time in the DHCP configuration database as a server parameter. See ``Specifying DHCP server parameters''. After the client accepts the address, the DHCP server notifies AAS that the address has been leased. If the AAS is not notified, the address can be reallocated by the address server after the reservation time expires.
A leased IP address becomes available again when either the DHCP server receives a ``release'' message from the client or the lease expires. To account for the possibility of drift between the clocks of the server and client, you can specify a Lease Padding parameter which extends the length of the lease. The default is 1% of the lease. The unpadded lease is known to the client. The DHCP server knows the padded lease so preventing the server from thinking that the lease expired before the client does. See ``Specifying DHCP server parameters''.
The DHCP server can configure a client with any of the options specified in RFC 2132. DHCP uses the same request and reply packet format as BOOTP so configuration options are carried in the portion of the BOOTP packet reserved for vendor extensions. DHCP terms this the ``options'' field and expands it from 64 bytes to 312 bytes.
Multiple sets of DHCP options can be specified in the DHCP configuration database. The following table shows the possible types of option sets and their precedence:
| Option set type | Precedence | Description |
|---|---|---|
| Client | Highest | Generally used to specify a static IP address for an individual client. The DHCP server automatically assigns this address to the client rather than using one obtained from the address pool assigned to the subnet. You can also create a client entry without a static address, if you need to specify unique option values for the client but still want its IP address to be assigned dynamically. A DHCP client identifies itself to the server using its network hardware (MAC) address, or using an identifier if it is an opaque client. As many sets of client options can be created as are needed. |
| User class | Offered to any client that specifies the user class identifier in the ``discover'' message. As many sets of user class options can be created as are needed. | |
| Subnet | Includes the name of the address pool from which the DHCP server draws IP addresses to allocate to clients, the default and maximum leases for these addresses, and lease renewal and rebind times, along with a set of DHCP options specific to the subnet. As many sets of subnet options can be created as are needed. | |
| Global | Lowest | Applies to all DHCP clients. Only one set of global options can be created. |
The set of global DHCP options, for example, applies to all clients, whereas a set of subnet options applies only to the clients on a specified subnet. If you configure the same option in more than one set of options, the precedence of the option type decides which the DHCP server offers to the client.
For example, if the ``LPR Servers'' option is specified in both the subnet set of options and the global set of options, the DHCP server configures the client with the LPR Servers information defined for the subnet.
An additional class of options is vendor class options. These are intended to provide information that is specific to a particular vendor's hardware. These options are offered to any client that specifies the vendor class identifier in the ``discover'' message. As many sets of vendor class options can be created as are needed for different types of client hardware. It is also possible to redefine a standard option (with codes in the range 1 through 254) for use by a vendor class. Such a redefined option is called a ``vendor-specific option'', and is only visible to the vendor class for which it is defined. Vendor class options are delivered ``encapsulated'' to the client and so are not affected by precedence rules that the server applies to other options.
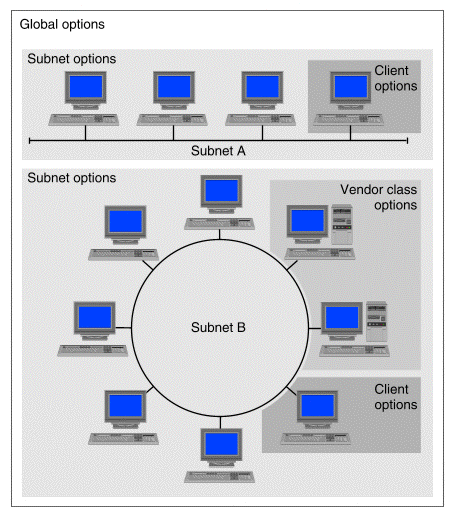
Mapping sets of DHCP options to a network
``Mapping sets of DHCP options to a network'' shows an example of how the option sets defined on the DHCP server can be considered as creating a map of the configuration parameters needed by DHCP clients:
Although the DHCP client can specify a larger response packet size, the practical limit for DHCP options is 274 bytes. (An additional 192 bytes can be provided if the option overload feature is enabled. Option overload is a server parameter.) Each option consists of a 2-byte header and the option data, such as an integer or an array of IP addresses. A single option cannot exceed 255 bytes of data.
If the server finds that the configured options exceed the allowable limit, it uses as many options as possible starting from the top of the configured options list and sends an error message to /var/adm/log/syslog. Clients can send a configured options list in the ``discover'' message. In the situation mentioned above, this ``Parameters Request List'' takes precedence over any other configured options.
Some DHCP options have default values. If you configure an option that has a default value and do not configure a value for the option, the DHCP server sends the default value. The following table lists DHCP options that have default values.
| Option name | Default value |
|---|---|
| Broadcast address | Network/subnet number with all 1's for the host |
| Router discovery | 1 (enable) |
| IP forwarding | 0 (disable) |
| Non-local source routing | 0 (disallow) |
| TCP keepalive garbage | 0 (disable) |
| Default IP time to live | 64 |
| Ethernet encapsulation | 0 (RFC 894, Ethernet version 2) |
| Default TCP keepalive interval | 0 (no keepalives) |
| Time offset | Obtained from host |
| Boot file size | Obtained from host |
In addition to the DHCP options specified in RFC 2132, you can define new options with codes in the range 128 through 254. These user-defined options become part of the total set of DHCP options configurable globally or for any client, subnet, user class or vendor class. To define a new option, you need to specify the following information for it:
The SCO DHCP server, in.dhcpd, does not support BOOTP clients directly. It can be configured to forward BOOTP requests to the BOOTP server, in.bootpd, as follows:
bootps dgram udp wait root /usr/sbin/in.bootpd in.bootpd
#bootps dgram/i udp wait root /usr/sbin/in.dhcpd in.dhcpd -b bootps-alt
#bootps-alt dgram udp wait root /usr/sbin/in.bootpd in.bootpd -S
The first entry configures dhcpd to forward BOOTP requests to bootpd on port bootps-alt (defined as 950 in /etc/services). The second entry configures bootpd to listen in slave mode on port bootps-alt.
or by stopping and restarting it:
sacadm -k -p inetd
sacadm -s -p inetd
You can start the DHCP Server Manager in the following ways:
 DHCP Server Manager.
Depending upon the selection made in the View menu,
the main screen of the DHCP Server Manager
shows global entries, subnet entries, client
entries, user classes, vendor classes, or user-defined options
that you have configured.
Use
View Expand
to examine the complete details
for a selected entry in the list,
and
View Collapse
to display just its name and description.
You can also expand and collapse individual entries by
double-clicking on them.
You can expand and collapse all entries using
View Expand All
and
View Collapse All.
With the DHCP Server Manager, you can perform the following tasks:
You can define new options that are not available in the set of global options. These are termed ``user-defined options'' and are assigned codes in the range 128 through 254.
When configuring options for a vendor class, you can also define vendor-specific options that are unique to an individual vendor class. Vendor class options can be assigned codes in the range 1 through 254. This means that you can redefine any standard global option if this is required by a particular vendor's hardware. This redefined option only applies to the vendor class for which it is defined.
To create a new user-defined or vendor-specific option using the DHCP Server Manager:
User Defined Options,
and then select
Entry Add.
If you want to add a vendor-specific option, click on the Add button next to the list of defined options on the Vendor Generic Options Configuration screen.
If the type is an array of integers or IP addresses, enter the minimum number of entries allowed.
If the type is an array of integers or IP addresses, enter the maximum number of entries allowed.
To modify a user-defined or vendor-specific option using the DHCP Server Manager:
User Defined Options,
select the option from those listed, then select
Entry Modify.
If you want to modify a vendor-specific option, select the option from the list of defined options on the Vendor Generic Options Configuration screen, and click on Modify.
To delete a user-defined or vendor-specific option using the DHCP Server Manager:
User Defined Options,
select the option from those listed, then select
Entry Delete.
If you want to delete a vendor-specific option, select the option from the list of defined options on the Vendor Generic Options Configuration screen, and click on Delete.
Global DHCP options are parameters which are not specific to individual subnets and are usually the same for all hosts. Examples are the list of DNS name servers and the name of the local domain.
You can also define DHCP options for sets of subnet, vendor class, user class, and client options by clicking on Generic while defining or modifying an option set. The options defined within a set of options always override the globally defined option. An option defined within a set can override that defined in other sets according to the precedence of the set. See ``DHCP options'' for more information.
(global)
in the list of available DHCP options.
When configuring a vendor class, you can define
vendor-specific options with codes in the range 1 through 254.
A vendor-specific option definition only applies to the vendor class
for which it is defined. It is indicated by the tag (vendor)
in the list of available DHCP options for the vendor class.
To configure options using the DHCP Server Manager:
Global Options.
Select
Entry Add
if no options are currently defined, or otherwise select
Entry Modify.
To modify options defined within an option set,
select one of Subnets, Clients, User Classes,
Vendor Classes, or User Defined Options
from the View menu. Select the
option set from those listed, and select
Entry Modify.
To add an option, highlight the option in the ``Unused''
list and click on Add to move it to the ``Configured'' list.
Enter the value(s) for the option and click on OK.
To modify an option within a set, highlight it in the ``Configured'' list and click on Edit value. Change its value(s) and then click on OK.
To delete an option from a set, highlight it in the
``Configured'' list and click on  Remove
to move it to the ``Unused'' list.
Remove
to move it to the ``Unused'' list.
Once you have defined a vendor-specific option, you can select it for use by the vendor class by moving the option to the ``Configured'' list and defining its value.
To modify an existing vendor-specific option, highlight it in the ``Unused'' list and click on Modify.
To delete an existing vendor-specific option, highlight it in the ``Unused'' list and click on Delete.
Global Options,
select the option to be deleted from those listed, then select
Entry Delete.
Click on OK when prompted to confirm the deletion.
You can add subnets configured on your network that have DHCP clients. For existing subnet entries, you can change the address pool, default lease parameters and DHCP options. You can also access the Address Allocation Server from the Subnet Entry screen and modify address pools to facilitate the changes you need to make. If you need to change a subnet address, you must first delete the subnet entry and then define it again with the new subnet address.
To add a subnet definition using the DHCP Server Manager:
Subnets.
Add.
To modify a subnet definition using the DHCP Server Manager:
Subnets.
Modify.
To delete a subnet definition using the DHCP Server Manager:
Subnets.
Delete.
If you need to group machines according to their hardware or software configuration, and these machines need options other than standard options, you can define vendor classes to achieve this. A client of a particular vendor class will then receive the appropriate vendor-specific information and parameters.
To define a vendor class using the DHCP Server Manager:
Vendor Classes.
Add.
To modify a vendor class using the DHCP Server Manager:
Vendor Classes.
Modify.
To delete a vendor class using the DHCP Server Manager:
Vendor Classes.
Delete.
If you need to group machines according to department, work group, or physical location, and you want to provide the same options to all clients in the group, you can add user classes to achieve this. You might, for example, want different groups to use different print or DNS servers.
To define a user class using the DHCP Server Manager:
User Classes.
Add.
To modify a user class using the DHCP Server Manager:
User Classes.
Modify.
To delete a user class using the DHCP Server Manager:
User Classes.
Delete.
If a DHCP client requires a custom set of options but not a fixed address, you can create an entry without defining an IP address or host name.
Machines such as networked printers, print servers, DNS servers, and file servers require fixed IP addresses so that clients can locate them. Some of these machines may also be capable of obtaining configuration parameters as DHCP clients.
To define a client configuration using the DHCP Server Manager:
Clients.
Add.
IEEE 802.3 frames can use the same network topology as Ethernet II frames but their structure is different. Most TCP/IP networks are configured to use Ethernet II framing.
If your network has a Token Ring or Token Bus topology, select IEEE 802.
To modify a client configuration using the DHCP Server Manager:
Clients.
Modify.
To delete a client configuration using the DHCP Server Manager:
Clients.
Delete.
To specify DHCP server parameters using the DHCP Server Manager:
Edit Server Parameters.
Address Allocation Server.
If the AAS server does not run on the same host as the DHCP server, select Remote, enter the IP address of the AAS server, and enter a password that will authenticate the DHCP server to the AAS server.
Use these procedures for solving the following problems with DHCP:
If a particular client will not boot, the problem may center on IP address assignment. If the DHCP server dynamically assigns an address to the client, first check /var/adm/log/syslog and search for the ``No available addresses'' message. This indicates that all the addresses in the pool assigned to the client's subnet have been allocated. There are a number of actions you could take:
Another possibility is that the DHCP client may require certain vendor-specific options to be provided by the DHCP server so that the client can boot successfully. You must define a set of vendor-specific options within a vendor class and assign values to these. The data in these options will be assigned only to DHCP clients which specify the identifier for the vendor class. The identifier must be defined to be the same as the string that the clients use to identify their hardware type to the server. The documentation supplied by the hardware manufacturer should detail the vendor class identifier as well as the DHCP option codes, data types, and values of any vendor-specific options that the clients will require. See ``Specifying vendor class option sets'' for more information.
If the DHCP server cannot find the Address Allocation Server, that server may be down and needs to be restarted using the Address Allocation Manager.
If a client has been configured with an IP address and DHCP options, but not with all the options you specified in the DHCP Server Manager, too many options may have been specified for the client. The DHCP server has a 274-byte practical limit for DHCP options (466 bytes if the Option Overload feature is enabled). Check /var/adm/log/syslog for one or more messages of the form ``Option code did not fit in packet''. This indicates that the DHCP server did not send all the options specified for the client because the total size of all the client's options exceeded the ``options'' field size. Follow the steps below to determine why there may be too many options:
To obtain more information about DHCP, see the following manual pages:
| Manual page | Information provided |
|---|---|
| aasd(1Mtcp) | Address Allocation Server daemon |
| aasd.conf(4tcp) | Address Allocation Server daemon configuration file |
| bootpd(1Mtcp) | Internet Bootstrap Protocol server daemon |
| bootpgw(1Mtcp) | Internet Bootstrap Protocol gateway daemon |
| dhcpd(1Mtcp) | Dynamic Host Configuration Protocol daemon |
| dhcpd.conf(4tcp) | Dynamic Host Configuration Protocol daemon configuration file |
| RFC | Title |
|---|---|
| 1122 | Requirements for Internet Hosts -- Communication Layers |
| 1534 | Interoperation Between DHCP and BOOTP |
| 1542 | Clarifications and Extensions for the Bootstrap Protocol |
| 2131 | Dynamic Host Configuration Protocol |
| 2132 | DHCP Options and BOOTP Vendor Extensions |